
Most people researching laser tattoo removal end up scrolling through before and after photos, trying to picture their own tattoo on the right-hand side. That's a reasonable instinct. A single photo pair can tell you a great deal, but only if you know which details to look at and which questions to ask about it.
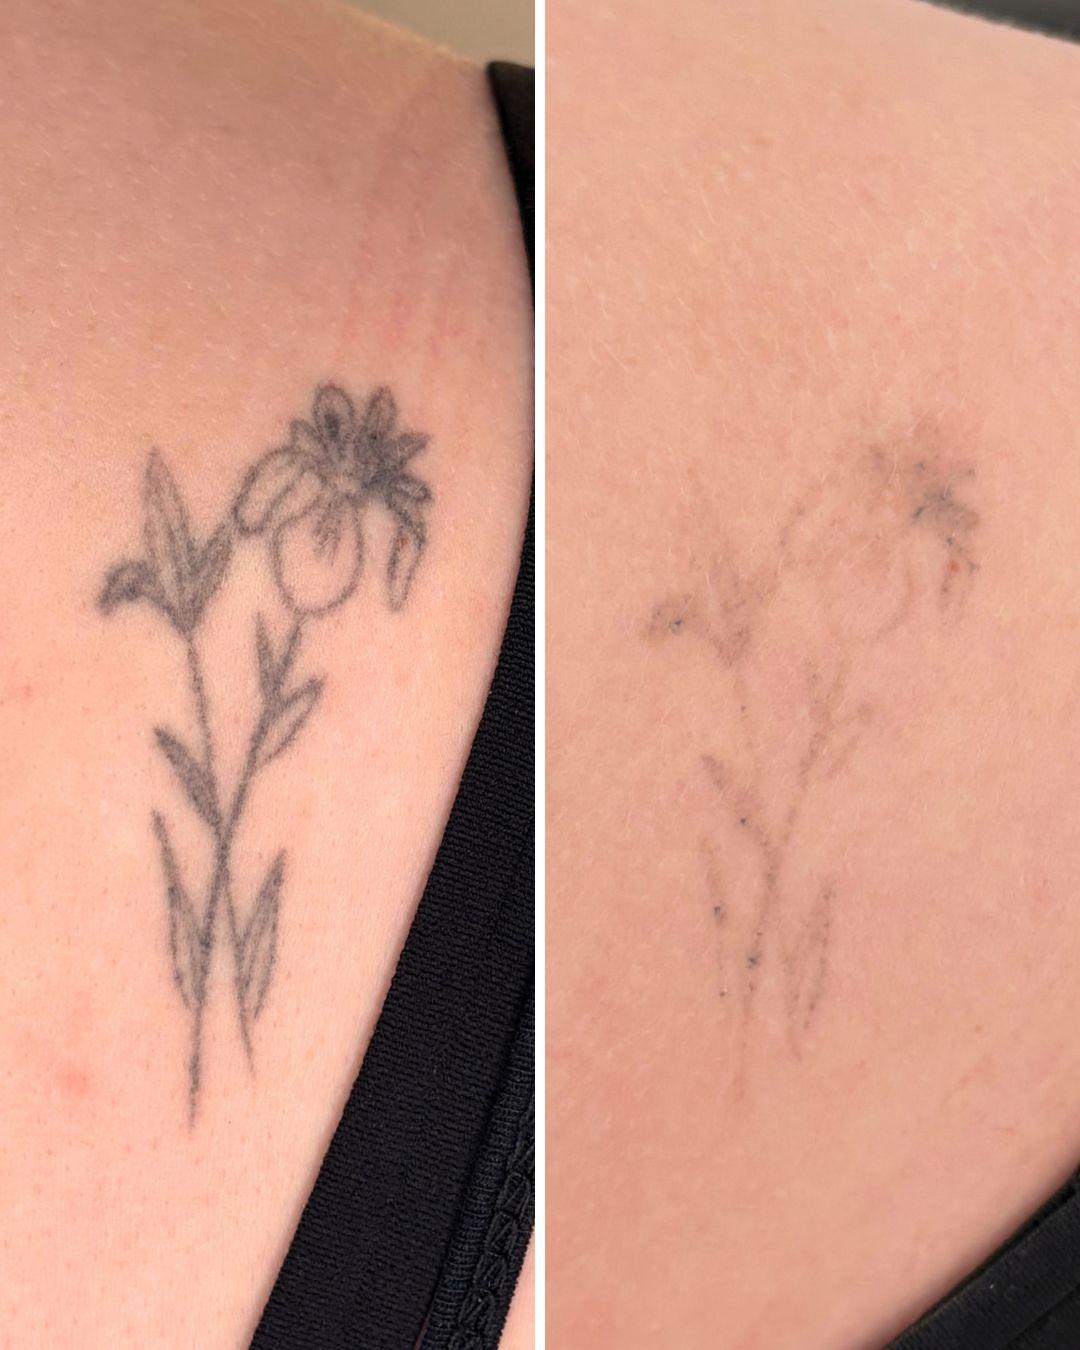
The photo above is a good place to start. It shows a fine line flower near the shoulder, before treatment and after two sessions on the PicoWay. The change is clear, and it also carries a few details that are easy to miss on a quick scroll.
Start with the session count
A before and after photo without a session count is close to meaningless. Two sessions and ten sessions are completely different stages of the process, and a striking result means very little if you don't know how long it took to get there.
The flower above is two sessions in. For this kind of tattoo, that pace makes sense. The design is made of thin lines and light shading, which hold far less pigment than a solidly packed piece. Billy DeCola, the founder of Studio Kiku, explains the difference this way: "A very light, thin tattoo is going to fade a lot quicker than a deep, dark, saturated tattoo will."
A bold, saturated tattoo photographed after two sessions often looks only slightly lighter. That isn't a sign the laser failed. The laser breaks the pigment up quickly, and then the body takes its time clearing it. As Billy puts it, "The laser is really fast with breaking up the pigment particles, but your body's lymphatic system is what takes all of the time."
Look at where the pigment is lingering
Fading is rarely even, and a good before and after shows you that. In the flower photo, the long stems and leaves have dropped to faint grey outlines. The flower head, where the original shading was densest, is still holding more colour than the rest of the design.
There are also a few small dark specks scattered along the stems. Specks like these usually mark places where the pigment sat a little deeper or denser. Light shading usually lifts first, and the deeper, more saturated pockets stay behind longer. When you see specks or darker patches in someone else's progress photo, you're looking at the normal order in which a tattoo comes apart, not a flaw in the treatment.
Check the skin, not just the tattoo
The part of a before and after photo that matters most is often the skin around the design. In the after photo above, the skin texture matches the untreated skin beside it. There's no raised outline in the shape of the flower, no shiny patch, and no lighter or darker halo tracing the old lines.
That's the result to look for. A tattoo that disappears quickly but leaves a scar or a change in skin tone behind isn't a good outcome, however fast it happened. Studio Kiku treats the condition of the skin as the real measure of success, which is why settings are chosen carefully and sessions are spaced a minimum of 8 weeks apart. You can read more about how the studio approaches the process on the laser tattoo removal page.
Notice the lighting and the angle
Two photos taken weeks or months apart will rarely match perfectly. In this pair, the after shot is framed a little closer and the light falls differently on the skin. Neither is a problem, but they're worth noticing, because lighting can make a tattoo look lighter or darker than it really is.
A fair comparison keeps the same part of the body in frame, at a similar distance, without filters. Studio Kiku takes before photos at the start of the process so there's a clear record of where the tattoo began. Those photos make it possible to look back across the sessions and see the progress, which is often hard to judge in a mirror from one day to the next.
Someone else's photo is not your timeline
The hardest part of looking at before and after photos is that they can set expectations a reader's own tattoo may not follow. This flower was thin, lightly shaded work. A dense blackwork piece, a tattoo with colours mixed with white, or a design layered over an older one can move much more slowly, and some tattoos leave a faint shadow that never fully clears.
For a dark, saturated tattoo, complete removal typically takes 9 to 12 sessions, and some need more. Studio Kiku never guarantees complete removal, because how quickly each person's body clears the broken-up pigment is the one variable nobody can predict. A photo that matches your tattoo's style and size is a useful reference point. It isn't a promise.
If you'd like to see more of how Billy walks through real results session by session, he covers it in detail on the FADED Podcast.
Bringing your own tattoo in
Once you've looked at enough photos, the next useful step is having someone look at your actual tattoo. A consultation at Studio Kiku is free, and it's where the team can tell you how your tattoo's lines, shading and saturation compare with the photos you've been studying. Your before photos are taken then too, so your own progress has a starting point. Book a free consultation in Vancouver, Langley or Vaughan.
Thanks for reading.